Network Drive (Mac)

If you frequently access a file server from a Mac, it is helpful to map the network drive to your desktop. There are two ways to do this. One method is only mapped for one time use and will reset after a reboot. The other method is a more permanent route that allows the mapped network drive to always appear and mount on your desktop after system reboots and user log ins.

Method 1: Mapping a network drive to Mac OS X

This method maps a network drive that will disappear if the network connection drops or if you reboot your Mac:
  1. From the Mac OS X Finder, hit Command+K to bring up the Connect to Server window.
  2. Enter the path to the network drive you want to map, e.g. smb://fileshares/data
  3. Click Connect
  4. Enter your userID and password (type ad\before your userID:ad\userID) and click OK
    to mount the network drive
  5. The drive will now appear on your desktop and in the Finder window sidebar under Shared. ( If not visible on the desktop, see below.)

Method 2: Mapping a network drive to Mac OS X that remounts after system reboots

This method allows you to reboot your Mac and have the mapped network drive automatically remount and appear on the desktop. This is more persistent than the above method.
  1. From the Finder, hit Command+K
  2. Enter the path to the network drive you want to map, e.g. smb://fileshares/usr/userID
  3. Click Connect
  4. Enter your userID and password (type ad\ before your userID: ad\ userID) and click OK
  5. The drive is now mounted. Continue on to map for system reboot persistence
  6. Now enter into System Preferences, from the Apple menu
  7. Click on Accounts
  8. Click on Login Items
  9. Click on the + button to add another login item
  10. Locate the network drive you previously mounted and click Add
  11. Exit out of System Preferences
Your network drive will now be mapped and automatically remounted when you reboot
your Mac.
 

Making the mapped network drive visible on the Mac desktop

It is possible that the mounted drive will not appear on the desktop due to a system setting. If you want the mapped drive icon to be visible on the desktop, take the following additional steps:
  1. From the Finder, open Finder Preferences by hitting Command+, (hold down Command and press the comma key)
  2. Click the General tab
  3. Select the checkbox next to Connected Servers
  4. Close Finder Preferences
Selecting the checkbox next to Connected Servers ensures that you will see the icon on your Mac desktop. Otherwise, it will only be visible in the Finder window sidebars and Open/Save dialogues

Remounting the mapped network drive with a click

A useful additional step for either method is to create an alias of the mapped network drive. This allows you to reconnect to the share with just a click.
Follow these steps:
 
  1. Right – click on the mapped network drive on the Mac OS desktop
  2. Select Make Alias
Now you can double – click that alias to reconnect to the network drive instantly. Another way to connect to the shared drives is to click on Finder, choose Go from the top menu, then click on Connect to Server. You will see a list where the server address can be added to your Favorite Servers. Click on the saved server, then choose Connect. The far right icon (which looks like a clock) has a drop – down menu to choose recent servers.
As you may have guessed, shared network volumes are treated differently by the OS than external drives and disk images, which is why this is a different technique than what you use to. You can also mount an ISO in Mac OS X access and mount smb, which allows for scripting possibilities, if you are shares via the command line interested in a more technical approach.
Creating an SSH Proxy Tunnel with PuTTY

Creating an SSH Proxy Tunnel with PuTTY

This tutorial is aimed at Windows users and focuses on PuTTY as our SSH client of choice.

Are you stuck behind a firewall or looking to add some privacy to your browsing? Whenever I’m off my own network I fire up an SSH tunnel back to my own servers and send all my browsing information through it. Why? Because big brother may be watching, but I can bet you someone even worse is trying to. Also, it could be incriminating if people knew how often I was checking my 9th (out of 10) place Fantasy Football team stats.

What is Tunneling? The Over Simplified Definition

When your browser (or other client) requests a webpage (or anything off the Internet) it sends a request from your computer through a series of routers, switches, firewalls, and servers owned and monitored by other people, companies, and ISPs until it reaches its destination, then follows the same (or similar) path back to your machine with the kitten pictures you asked for.

Tunneling bypasses some of the rules that these companies or ISPs may be enforcing on you by creating a direct, encrypted, connection to your tunnel server that can’t be easily peered into by prying eyes. This means that web pages that are blocked can be seen and passwords that are sent can’t be looked at.

For a much better definition, please see Wikipedia

Install PuTTY

There are other SSH clients and tools that are designed specifically for SSH tunneling and SOCKS proxying. I prefer this way because PuTTY also gives you an SSH client, which you should no doubt be in possession of anyways.

  1. Download PuTTY here (choose the archive version)
  2. Make a new directory at C:\bin
  3. Extract the contents of the putty archive into C:\bin
  4. An extra step that’s not really necessary- Add C:\bin to your Windows system path (if you don’t know how, skip this or google it)

Configuring PuTTY

  1. Fire up the client and enter the hostname and portPuTTY Hostname
  2. Type in a title under Saved Sessions and press Save
  3. On the left side, go to Connection->SSH->Tunnels
  4. In Source Port enter 8080 (this can be configured to be whatever you want, just remember it)
  5. Choose the Dynamic radio button under DestinationPuTTY Tunnel
  6. Press Add, you should then see D8080 in the box above
  7. Go back to Session on the left side and then press Save to save the changes

SOCKS Proxy

To utilize the tunnel to its full benefit, you need to set up a SOCKS proxy in your browser. Will describe how to use the FoxyProxy proxy switching plugin. It works for both FireFox and Chrome on Windows, which are really the only browsers you should be using.

  1. Download FoxyProxy for your browser here.
  2. Once installed, go to the FoxyProxy optionsFoxy Proxy
  3. Click Add New
  4. Click the General tab and enter a name in the Proxy Name box
  5. Make sure Perform remote DNS lookups on hostnames loading through this proxy is checked – we’ll discuss this a little later
  6. Select the Proxy Details tab
  7. Enter localhost in the Host box
  8. Enter 8080 in the Port box
  9. Check SOCKS Proxy? and make sure the SOCKS v5 radio is checked
  10. Press Ok to save
  11. At the Select Mode drop down, choose your freshly created SOCKS Proxy

Conclusion

So long as your PuTTY SSH connection remains connected your proxy tunnel will be open and you will be browsing the internet just as you had before, except without a lot of restrictions placed by firewalls and greater security.

Final Note: Secure DNS Resolution

As far as I understand it Chrome will automatically use your SOCKS proxy for DNS resolution, but Firefox doesn’t by default. This means that firewalls or DNS servers could still block requests to certain websites because they will refuse to tell your browser or client how to look the remote server up. FoxyProxy should fix this due to the installation steps we took, but it doesn’t guarantee that your IM messenger, other browsers, or other internet clients will be able to securely resolve DNS requests when using the SOCKS proxy. For more information on exactly what DNS is, browse over to Wikipedia

I recommend a 3rd party DNS service like OpenDNS to further enhance the safety, speed, and security of your DNS lookups. They can protect from malware and other bad things, but they can also provide you with a ‘less restricted’ internet.

Enabling Network Level Authentication on Windows XP Service Pack 3 for access to Server 2008 via Remote Desktop

When connecting to a Windows 2008 Server using remote desktop from a Windows XP client running service pack 2 or earlier, you get the following error message:

The remote computer requires Network Level Authentication, which your computer does not support.

To enable NLA in XP machines; first install XP SP3, then edit the registry settings on the XP client machine to allow NLA

• Configure Network Level Authentication

1. Click Start, click Run, type regedit, and then press ENTER.
2. In the navigation pane, locate and then click the following registry subkey: HKEY_LOCAL_MACHINE\SYSTEM\CurrentControlSet\Control\Lsa
3. In the details pane, right-click Security Packages, and then click Modify.
4. In the Value data box, type tspkg. Leave any data that is specific to other SSPs, and then click OK.
5. In the navigation pane, locate and then click the following registry subkey: HKEY_LOCAL_MACHINE\SYSTEM\CurrentControlSet\Control\SecurityProviders
6. In the details pane, right-click SecurityProviders, and then click Modify.
7. In the Value data box, type credssp.dll. Leave any data that is specific to other SSPs, and then click OK.
8. Exit Registry Editor.
9. Restart the computer.

Download Registry Key Tweak

Enable Concurrent Sessions In Windows Vista Business and Ultimate (SP1 32 and 64bit)

Enable Concurrent Sessions In Windows Vista Business and Ultimate (SP1 32 and 64bit)

Original

Enable Concurrent Sessions In Windows Vista Business and Ultimate (SP1 32 and 64bit)
What is Concurrent Sessions?

Concurrent sessions is a feature in server editions of Windows that lets more than one user to log on remotely and use the server at the same time. By default in Vista when you connect to a remote computer using Remote Desktop it will force the user who is physically sat at the computer to log off, this concurrent sessions hack allows you to Remote Desktop in to a computer without logging the current active user off, this will allow two people to use the same computer running Vista at the same time.

Why would you want to do this?

There could be many different reasons, for example in our house we have a dedicated Media Centre PC running in the living room, its handy for me to be able to log on to the pc without disrupting the person watching TV, with concurrent sessions I can do this.

It could also be useful if you have a shared computer and want to access your computer from school/work when someone else at home is using the computer, with the concurrent sessions hack you could do this without disrupting the user physically sat at the computer.

How to do it?

This is actually very easy now, a user on the greenbutton forums called untermensch has created a script that automates the entire process for you.

You can download the concurrent sessions hack from the Digiex mirror

After it has downloaded unzip and it and click on the install.bat file, if you have UAC enabled you might right click and run as Administrator.

Before installing make sure your Vista install has Service Pack 1 installed, this will not work if you don’t have SP1.

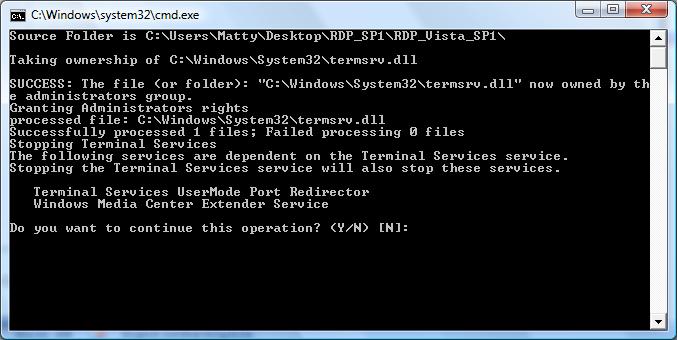
The script will ask if you want to continue:

Say yes

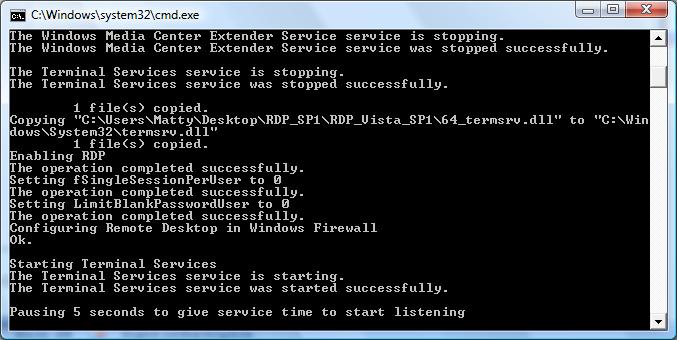
The concurrent sessions hack will now install:

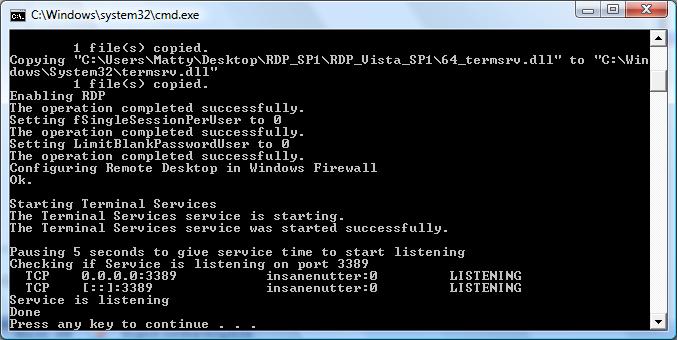
The installer will finish and check the Remote Desktop service is listening again:

That’s it, all been well the hack is installed successfully.

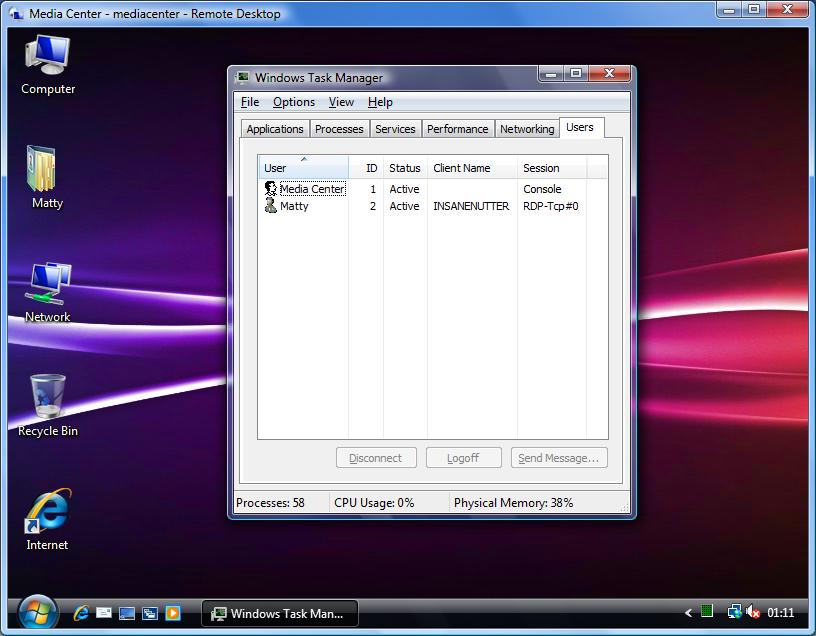
To test it out simply leave the current user logged on to the pc, now connect to the computer remotely using a different user account to the one you left logged on. If all has gone well both users will be logged on and active.

Here is a screen shot of me logged on to our Media Center remotely without logging the Media Center user off:

Apparently this hack will install on Vista Home Premium and enable the use of remote desktop (remote desktop is not supposed to be included in Vista Home Premium)

I don’t have a computer running Home Premium to test this out on, if you choose to do so try it at your own risk. Feel free to report back on your findings with Vista Home Premium.